 |
| Our Best Movie Kodi Addons 2019 Often Update |
What're the best Kodi addons for movies currently?... Follow our guide below to update for yourself Top 10 Best Movie Kodi Addons 2019. All of Kodi Add-ons that update in this page will often updates status "working or non-working", "great working or working not good", etc...
Also we will try hard working to remove any movie kodi addons that non-working & add new working movie kodi addons 2019.
- Note: A new list of best movie kodi addons in 2021 just updated HERE
TOP 10 BEST MOVIE KODI ADDONS 2019 LIST UPDATE [APRIL 2019]
Note: This page is only show you best list of kodi addons for watch movies & tv shows currently.
#1...13CLOWNS VIDEO
13Clowns video is a video kodi addon for movies and tv shows that located in 13Clowns repository. From the time, when Covenant & Neptune rising addon was gone( this is 2 best movie kodi addons in the past). 13Clowns Video have appeared and quickly became the best replacement for Neptune Rising addon. Few days ago, this addon has a new update to make it working so well so far, pulling many HD/1080p stream links...
How to install 13Clowns Video addon
1...Open Kodi on your devices
2...Click System Icon in the top left
2...Click System Icon in the top left
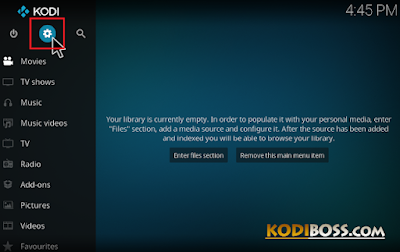
3...Click File manager
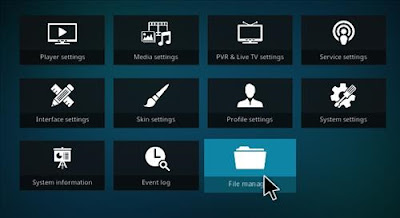
4...Double click on Add sources
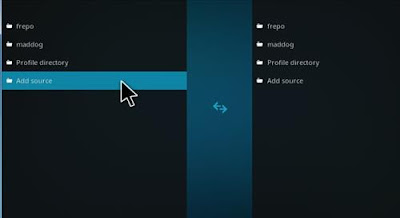
5...Select NONE on Add file source box
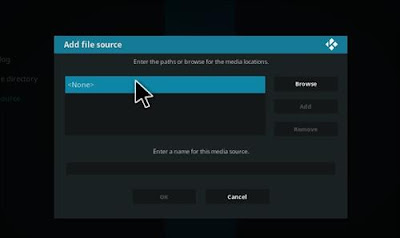
6...Copy as paste or type exactly this address on box:
https://the13clowns.github.io and click OK to confirm
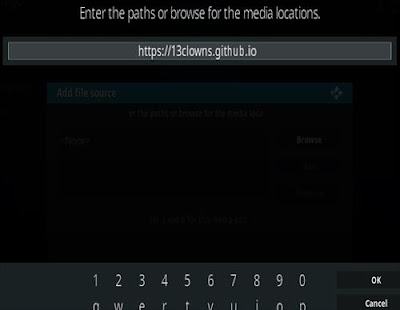
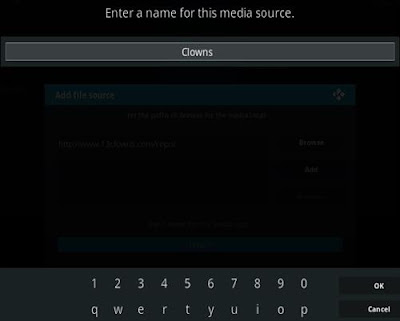
7...Type a name for media source box, ex: Clowns click OK to confirm
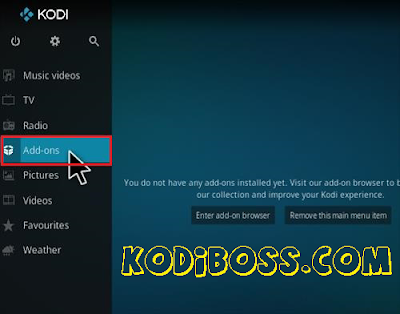
8...Go back to home kodi screen, then click Add-ons
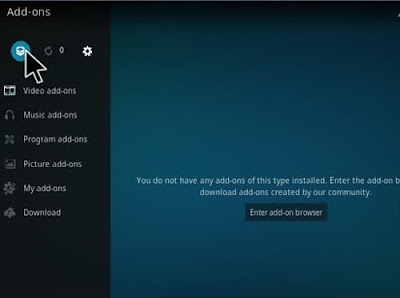
9...Click Box icon/ Browser add-ons in top left
10...Select Install from zip file
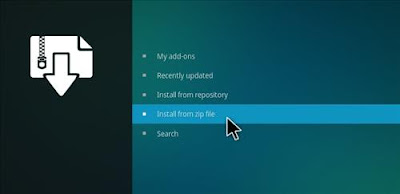
11...Continue select Clowns from your list
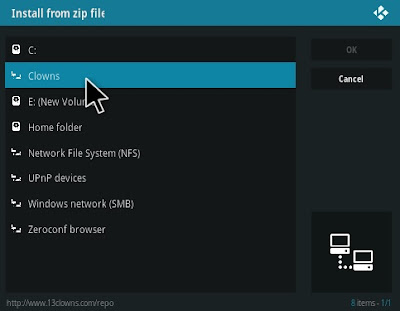
12...Continue find and select repository.13clowns-2.0.4.zip or higher
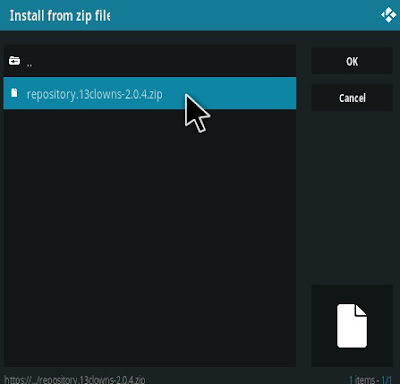
13...Wait few seconds for kodi system say that "13.Clowns Repo add-on installed"
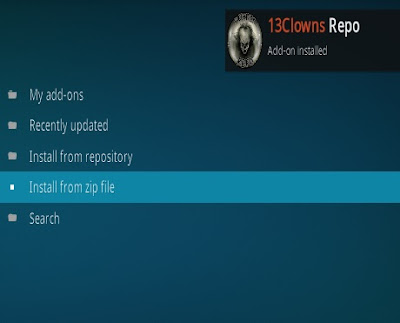
14...Then select Install from repository
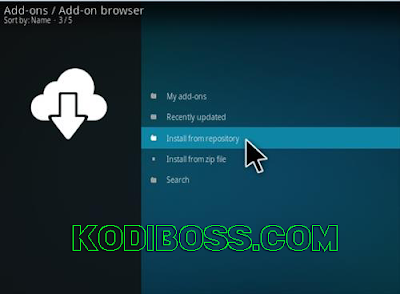
15...Select 13Clowns repository in your list repo
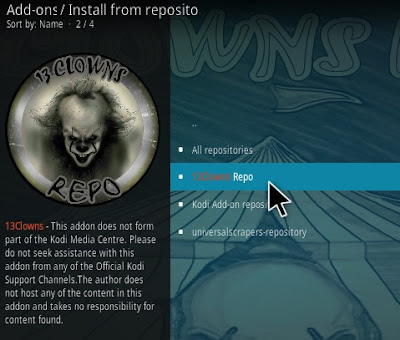
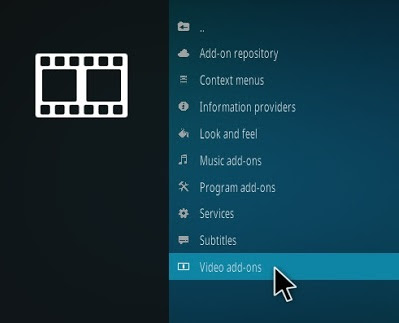
16...Select Video add-ons
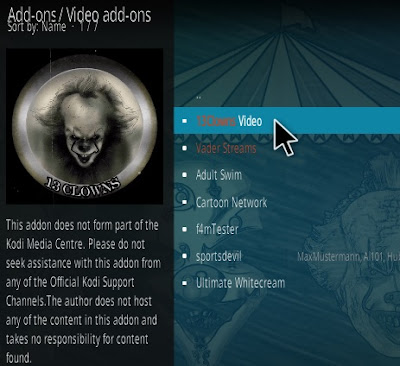
17...Select 13Clowns Video addon
18...Click Install.
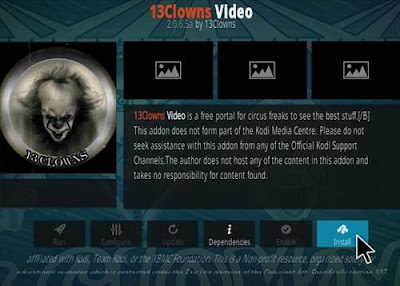
Done!...You have installed success 13Clowns video addon on your kodi, this is the first best movie kodi addon that i want show you today. Now, scroll down to continue learn about many great other kodi add-ons...
Elementum addon is an addon for Kodi that uses BitTorrent, a peer-to-peer file sharing protocol, to stream movies and TV shows in great video quality.
#2...OVEREASY
Overeasy addon is a nice Fork of Covenant addon that mod by Eggman. Sections includes Movies, TV Shows, My Movies, My TV Shows, New Movies, New Episodes, Channels, Tools, Search. It's a multi-scraper add-on that grabs its links from many sources. Both Real debrid & premiumize.me are supported if you have these account, it will help you watch movies with 1080p quality from many premium links
How to install Overeasy addon
How to install Overeasy addon
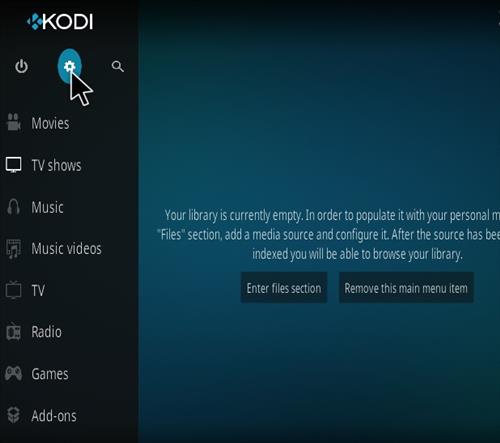
1… At the top left click the System Settings Icon
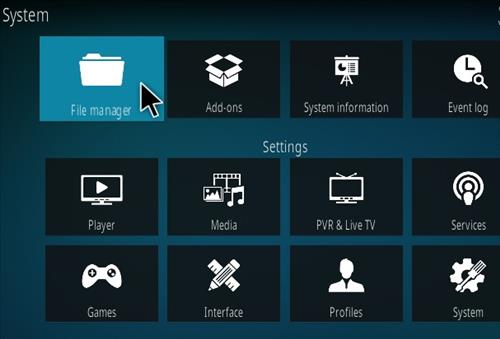
2… Click File Manager
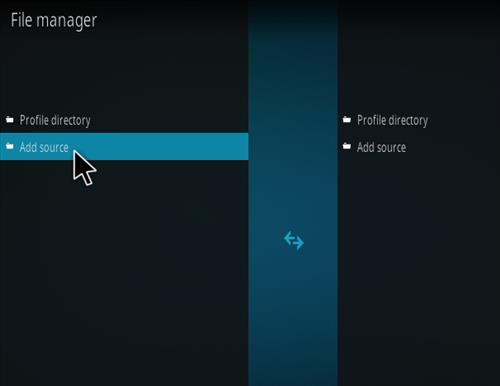
3… On the left click Add Source
4… Click where it says NONE
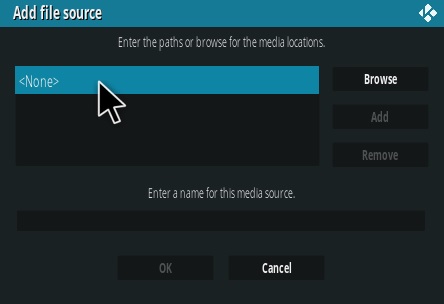
5… Type in the URL: http://repo.mreggman.xyz and click OK
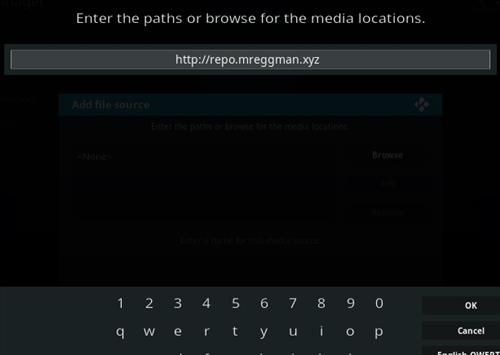
6… In the next box down name it MR Eggman and click OK
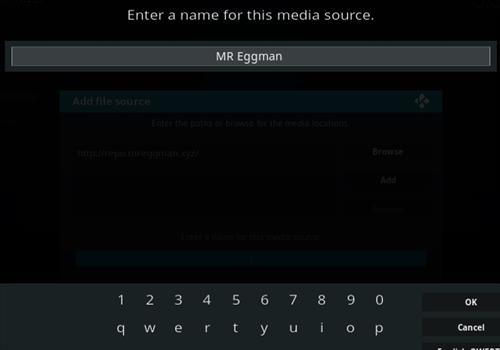
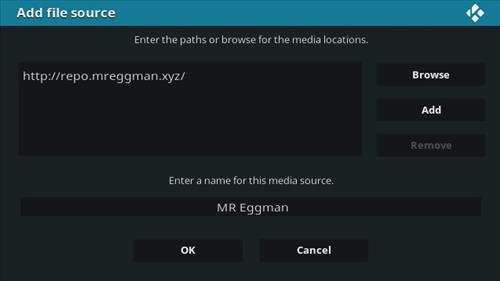
7… Double check everything is correct and click OK
8… Go back to the main menu and click Add-ons
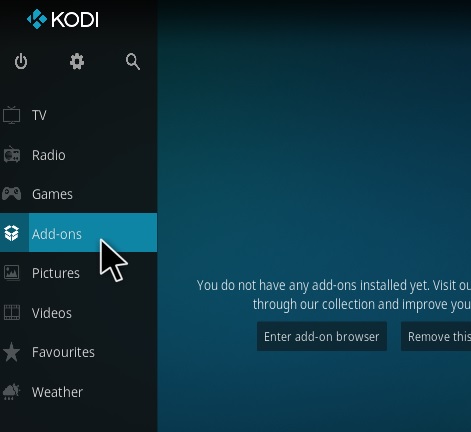
9… Click the Add-on Package Installer Icon at the top left
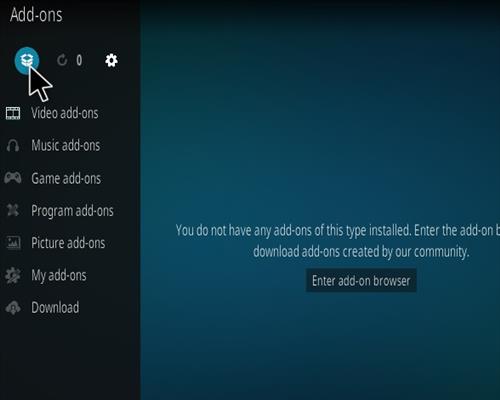
10… Click Install from zip file
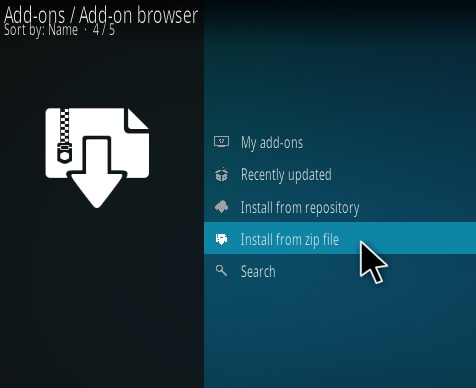
11… A box will pop open select MR Eggman
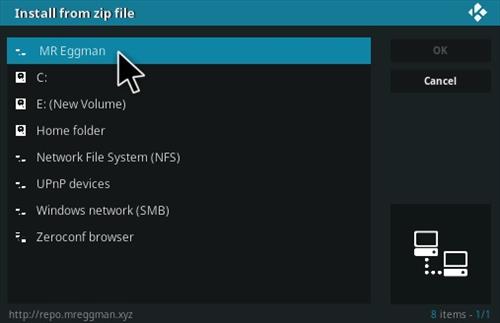
12… Click repository.eggman.zip
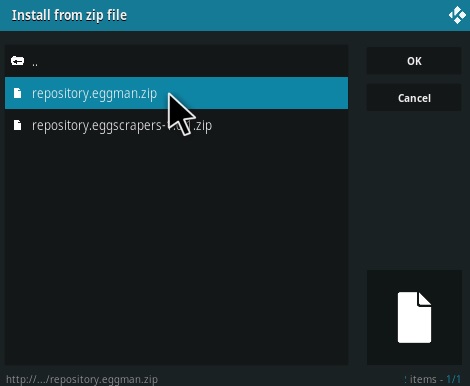
13… Wait for the Repository to download and popup at the top right and sayEggman Repository Installed
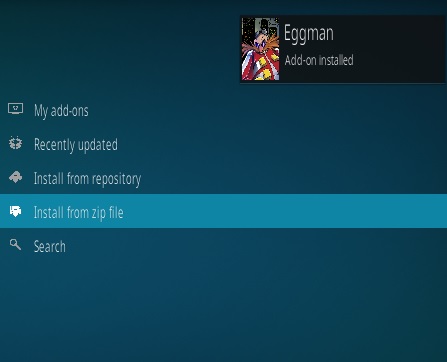
14… Click Install from repository
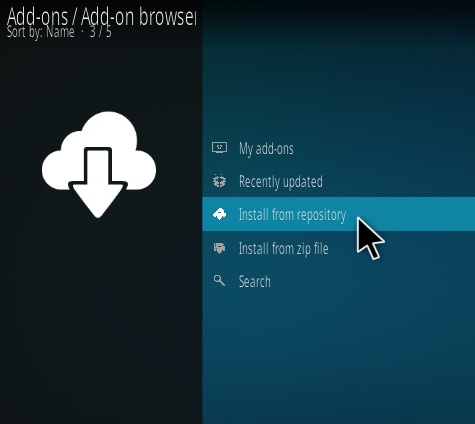
15… Click Eggman
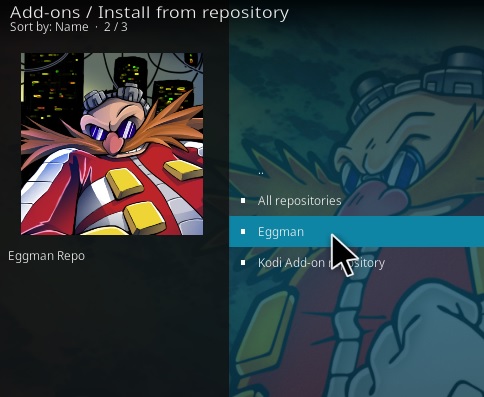
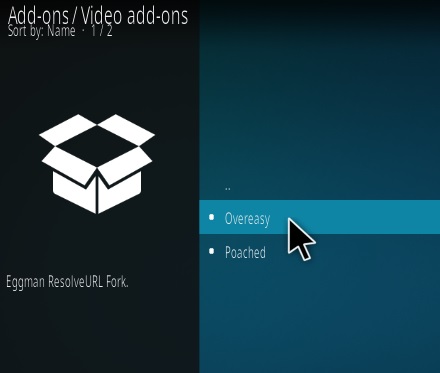
16… Video Add-ons
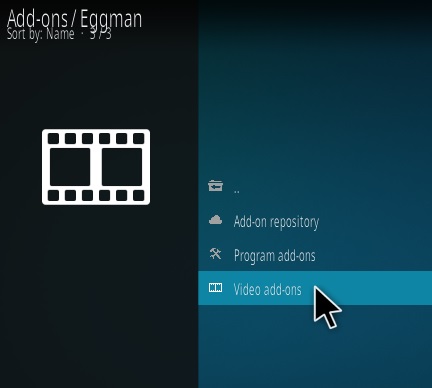
17… Click Overeasy
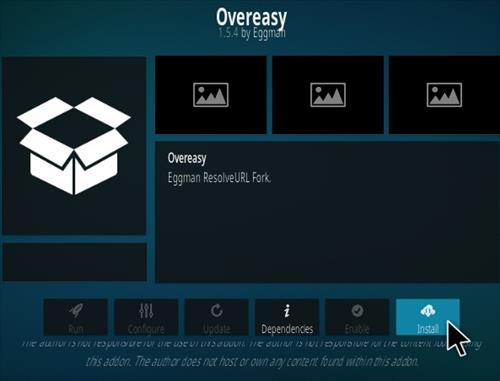
18… Click Install

2… Click File Manager

3… On the left click Add Source

4… Click where it says NONE

5… Type in the URL: http://repo.mreggman.xyz and click OK

6… In the next box down name it MR Eggman and click OK

7… Double check everything is correct and click OK

8… Go back to the main menu and click Add-ons

9… Click the Add-on Package Installer Icon at the top left

10… Click Install from zip file

11… A box will pop open select MR Eggman

12… Click repository.eggman.zip

13… Wait for the Repository to download and popup at the top right and sayEggman Repository Installed

14… Click Install from repository

15… Click Eggman

16… Video Add-ons

17… Click Overeasy

18… Click Install

#3...MAGIC DRAGON
The Magic Dragon is an all-in-one kodi addon with many sections to watch anything you want. This is a new name of the popular kodi addon The Pyramid. Sections includes Movie Search, People Watching, New Movie releases, 4K Movies, Catch up TV, Documentary, Kids, Music, Movies, Radio, Sport, TV/Entertainment and much more. With this addon, from now you have a fantastic movie kodi addon to watch new movies releases & movies series from many stream links...
How to install Magic dragon
How to install Magic dragon
- Open Kodi
- From the home screen, go to the System heading. When you see File Manager as a subcategory, click on it.
- Next, click on Add source, and then click on the highlighted line that says <None>.
- Enter http://mavericktv.net/mavrepo and hit the OK button.
- The source needs a name. Enter Mav or whatever you want to call it.
- Now, click the OK button to add the source.
- Once added, return to the home screen and click Add-ons. You should then see an open box icon in the upper left corner. Go ahead and click on it.
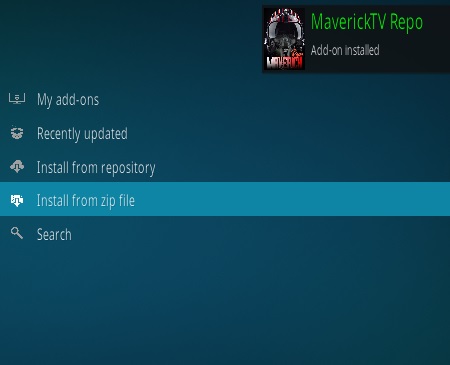
- Select Install from zip file.
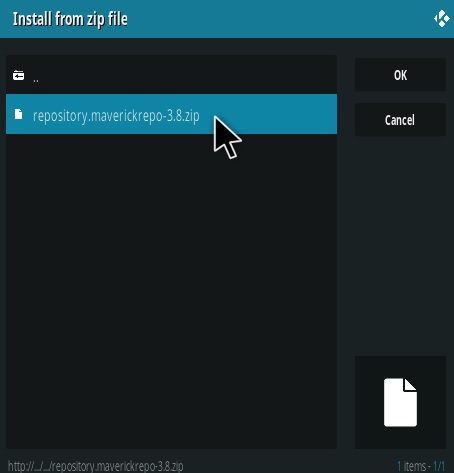
- Click on Mav and then repository.mavrepo.zip and wait for the notification message.
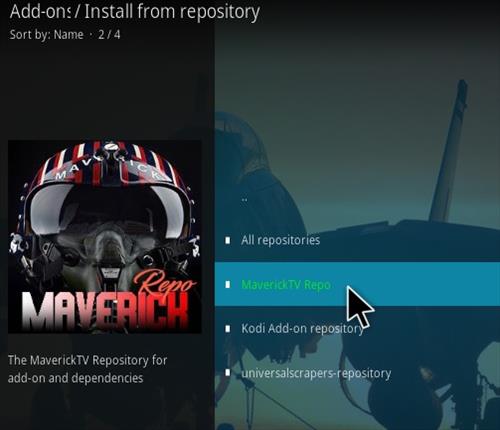
- Now, select the option that says Install from repository.
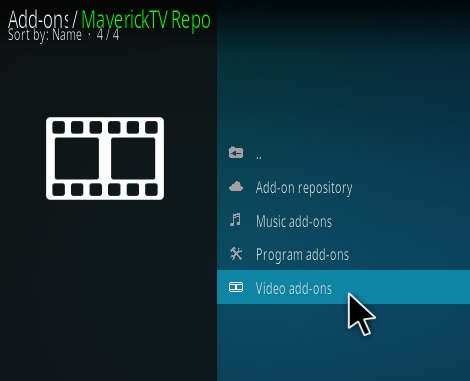
- Find MaverickTV Repo and click on it.
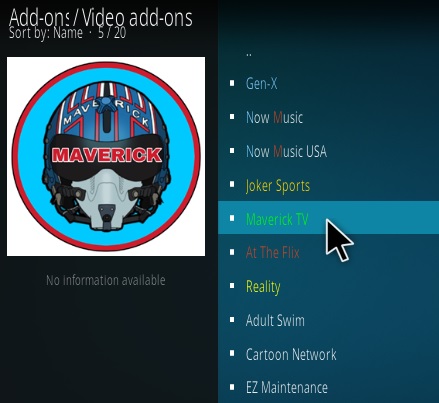
- Choose Video add-ons, and then Magic Dragon.
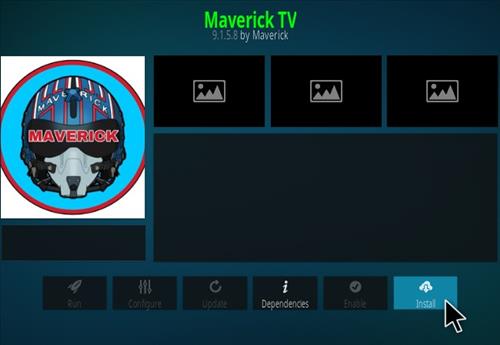
- Click the button that says Install, and wait for the message that says the addon is enabled.
- Wait for the notification message.
- To access, go back to the home screen and click Add-Ons. Now highlight Video add-ons and select Magic Dragon to launch the addon.
#4...EXODUS REDUX
Exodus Redux is a best Exodus Fork that located in Exodus Redux repository. Few days ago, this addon have updated to new version and working so great at the moment. It has interface same as with Exodus, so it's so easy to use. A new scraper Open scraper has update on it to replacement for old scraper that help you watch movies with many stream links. This is also a best movies kodi addon that you must installed on your kodi right now...
How to install Exodus Redux
1… At the top left click the System Settings Icon

2… Click File Manager

3… On the left click Add Source

4… Click where it says NONE
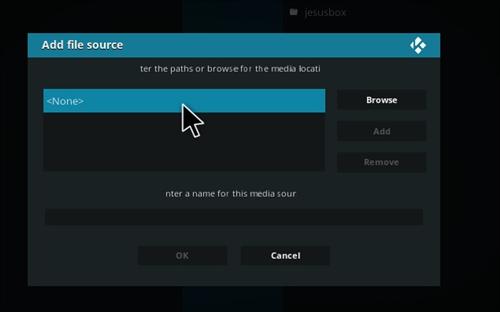
5… Enter the URL: https://i-a-c.github.io/ and click OK
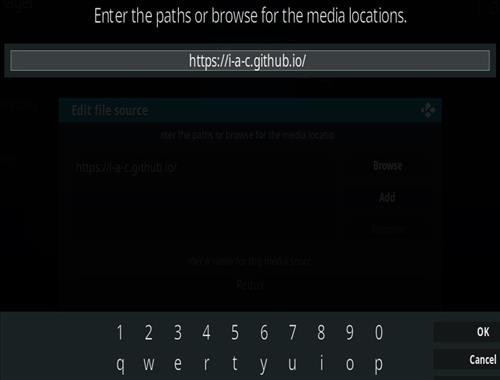
6… In the next box down name it Redux and click OK
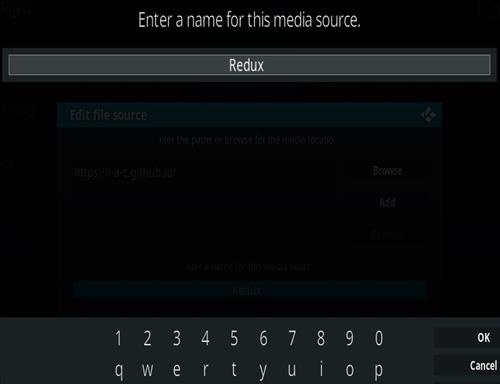
7… Double Check everything is correct and click OK
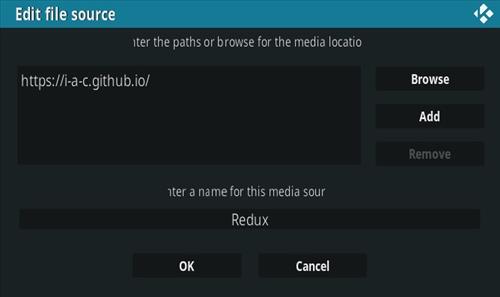
8… Go back to the main menu and click Add-ons

9… Click the Add-on Package Installer Icon at the top left

10… Click Install from zip file

11… A box will slide open find Redux and click it
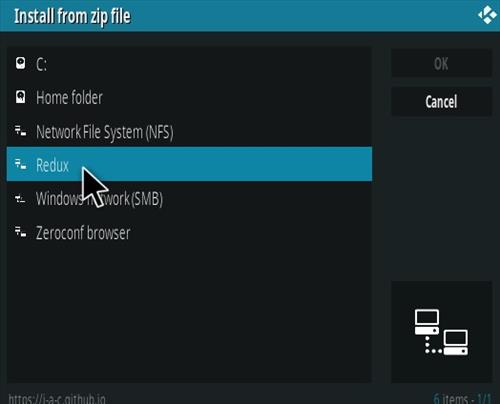
12… Click repository.exodusredux-0.0.8.zip
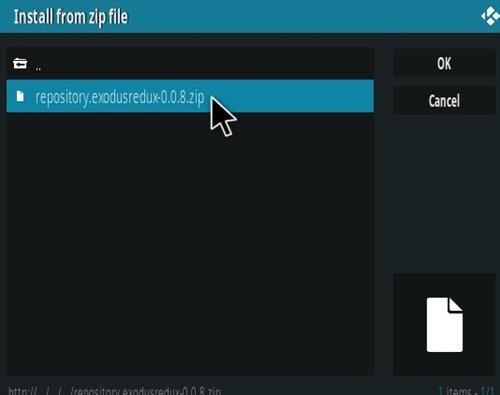
13… Wait for the Repository to download and popup at the top right and say Exodus Redux Repo Installed
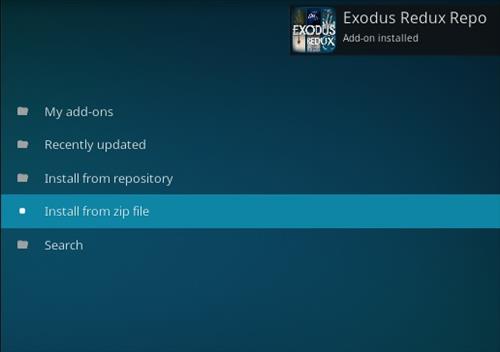
14… Click Install from repository

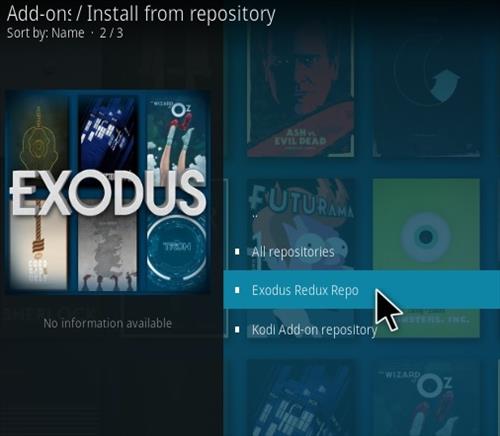
15… Click Exodus Redux Repo
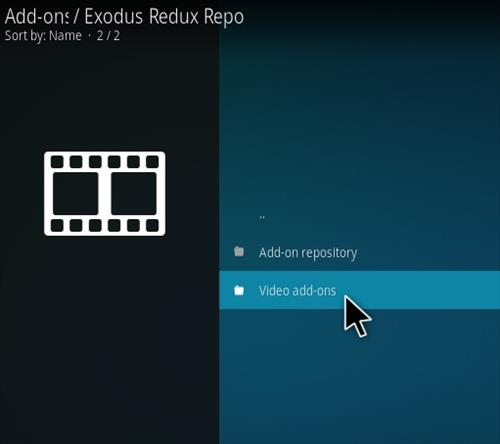
16… Video Add-ons
17… Click Exodus Redux
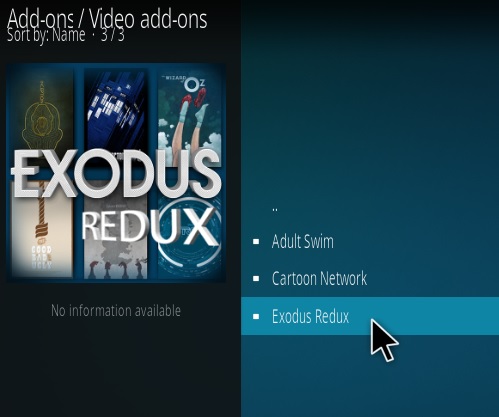
18… Click Install
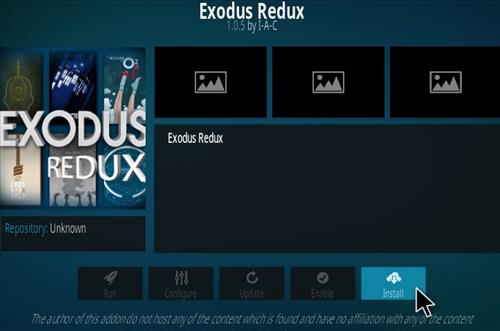
How to install Exodus Redux
1… At the top left click the System Settings Icon

2… Click File Manager

3… On the left click Add Source

4… Click where it says NONE

5… Enter the URL: https://i-a-c.github.io/ and click OK

6… In the next box down name it Redux and click OK

7… Double Check everything is correct and click OK

8… Go back to the main menu and click Add-ons

9… Click the Add-on Package Installer Icon at the top left

10… Click Install from zip file

11… A box will slide open find Redux and click it

12… Click repository.exodusredux-0.0.8.zip

13… Wait for the Repository to download and popup at the top right and say Exodus Redux Repo Installed

14… Click Install from repository

15… Click Exodus Redux Repo

16… Video Add-ons

17… Click Exodus Redux

18… Click Install

#5...DEATHSTAR
DeathStar is a Kodi Addon located in Ukodi1 and Team DNA Repositories. It is a collaboration of many developers and combines some popular Addons into one place including WoW, American Gods, M.E.T.V, Devastation, House Of Blue, Leviticus, Mysterious, One Click, Expose, Wumpa Fruits, Patriot, The Mad Titan, Raven, EIM and more. All of kodi addons are working so great inside Deathstar addon...If you want know about How to install deathstar addon for kodi 18 leia, follow our steps below:
Steps install guide:
Steps install guide:
- Kodi 18 Leia download.
- HOME Screen > Add-ons > Settings button > Enable Unknown Sources.
- BACK to HOME screen > Settings button > File Manager > Add Source.
- Enter http://uk1.site/Repo in the top box
- Enter UK1 in the bottom box > Click OK.
- BACK to HOME screen > Add-Ons > Add-on Browser
- Install from zip file > UK1 > repository.ukx-x.x.x.zip.
- Wait for Add-on enabled notification.
- Install from repository > uk1 > (Video/Music/Program) add-ons > Deathstar > Install.
- Wait for Add-on enabled notification.
- Congratulations, your Deathstar Add-on is now installed and ready to use
#6...MAVERICK TV
The Maverick TV Kodi addon is an excellent source for all kinds of content that is well-rounded in a number of areas: movies, TV, sports, music, and more. The addon has playlists and content not found anywhere else.
Maverick TV also contains some 4K content, which is hard to find in a lot of places.
Maverick TV is one of the longest running playlist Kodi addons has quietly been a really quality source for the Kodi community. The guide below includes important addon information for everyone! So dont forget added Maverick TV addon into your list best movie kodi addons 2019
How to install Maverick TV
1… At the top left click the System Settings Icon

2… Click File Manager

3… On the left click Add Source

4… Click where it says NONE

5… Enter the URL: http://mavericktv.net/mavrepo and click OK

6… In the next box down name it mavrepo and click OK
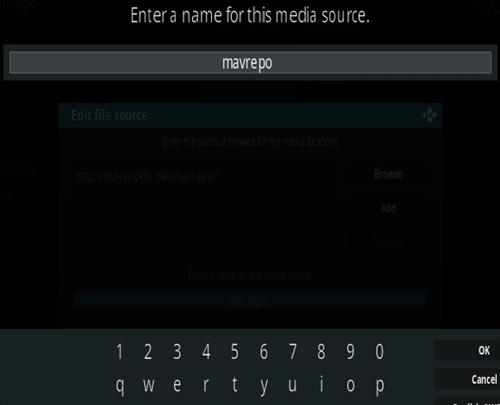
7… Double check everything is correct and click OK
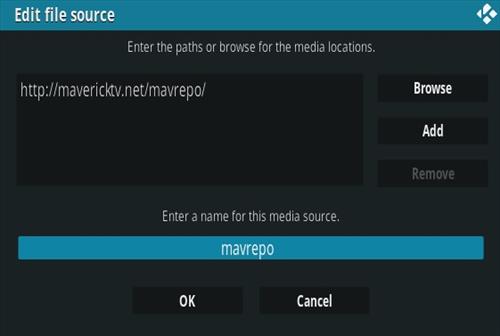
8… Go back to the main menu and click Add-ons

9… Click the Add-on Package Installer Icon at the top left

10… Click Install from zip file

11… A box will open find and select mavrepo
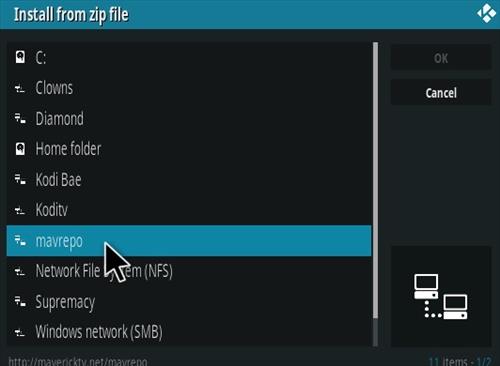

2… Click File Manager

3… On the left click Add Source

4… Click where it says NONE

5… Enter the URL: http://mavericktv.net/mavrepo and click OK

6… In the next box down name it mavrepo and click OK

7… Double check everything is correct and click OK

8… Go back to the main menu and click Add-ons

9… Click the Add-on Package Installer Icon at the top left

10… Click Install from zip file

11… A box will open find and select mavrepo

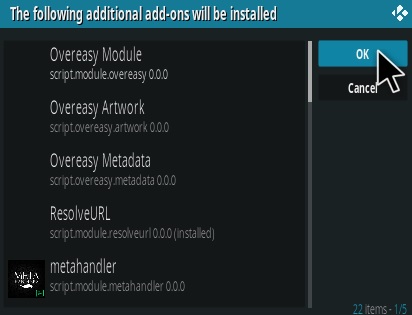
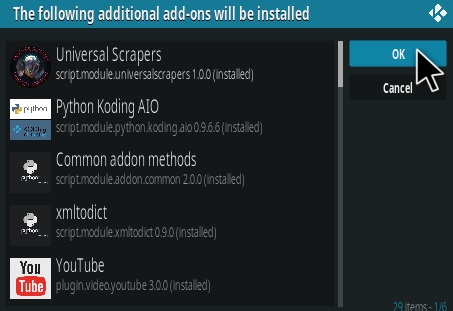
19…For Kodi 18 Leia users a box will popup showing all the dependencies and add-ons that will be install Click OK

#7...TEMPEST
The following step-by-step tutorial will show you How To Install Tempest Kodi Add-On. This guide provides instructions for installing Tempest on both Kodi 18 Leia and 17.6 Krypton.
Tempest serves up Movies and TV Shows for streaming. It is a fork of the ever-popular Covenant add-on that is no longer supported.
Currently, Tempest is working fabulously with tons of high quality links including 4k options. Our guide below will provide all steps that help you learn about how to install tempest kodi addon.
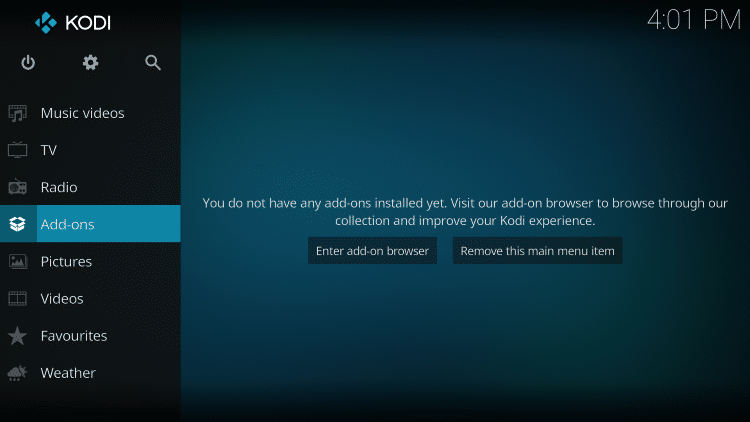
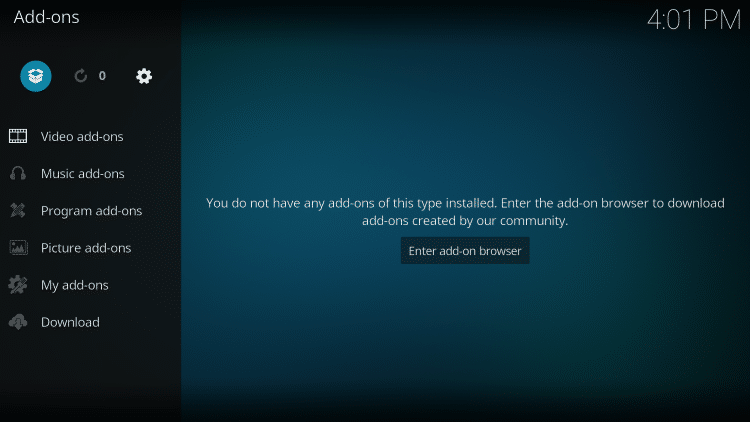
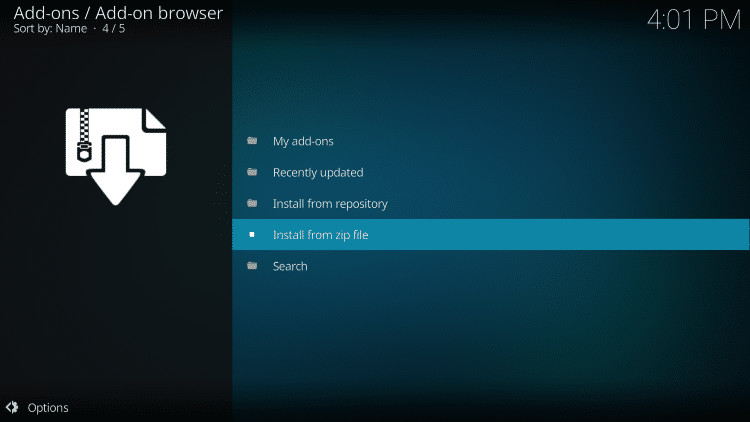
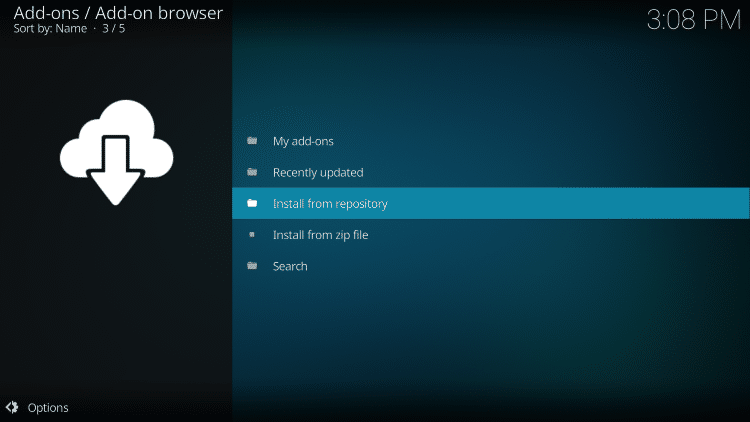
- Launch Kodi
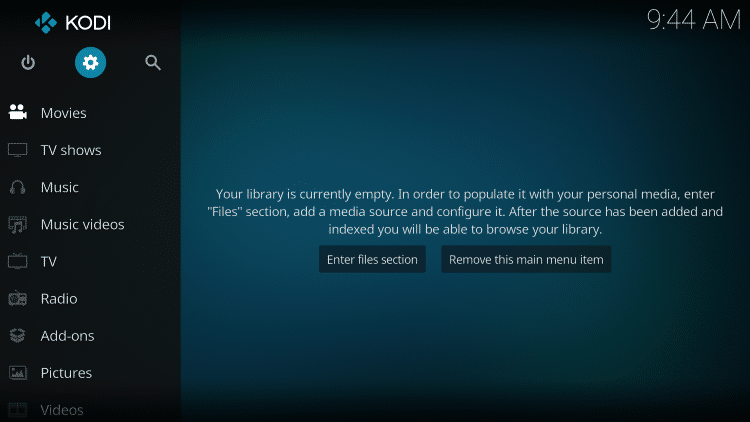
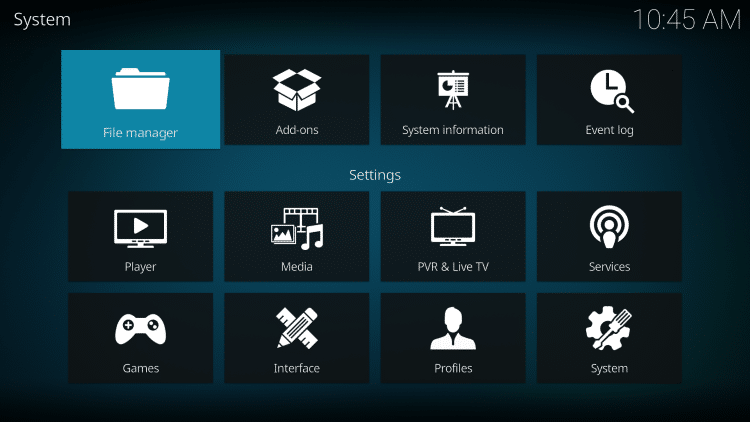
- Click the settings icon


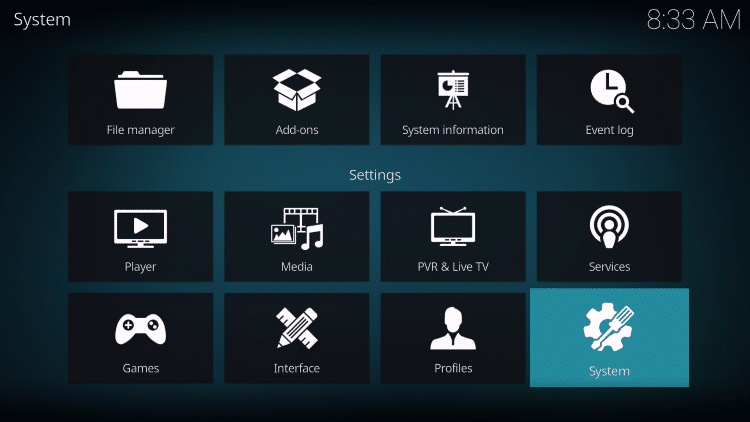
- Click System

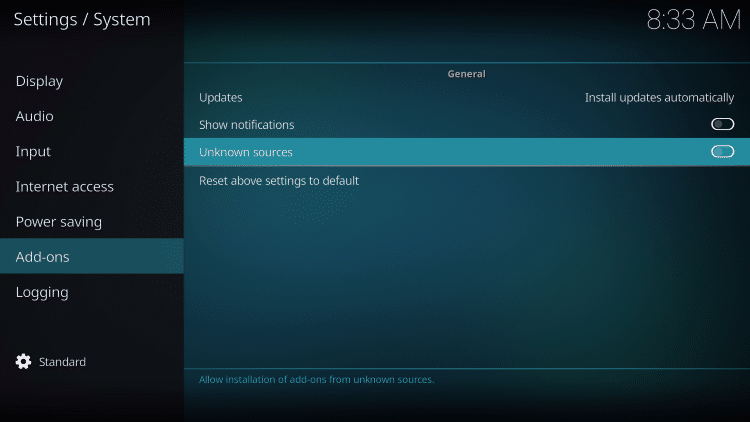
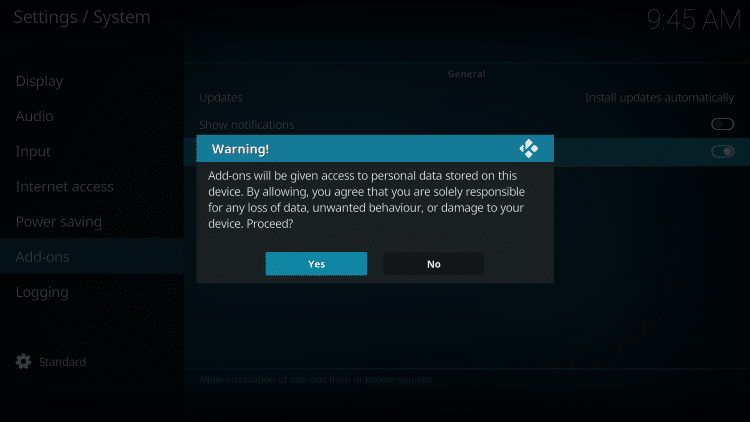
- Hover over Add-ons menu item and turn on Unknown sources if not already on

- Click Yes

- Click back on remote to go back to the System page
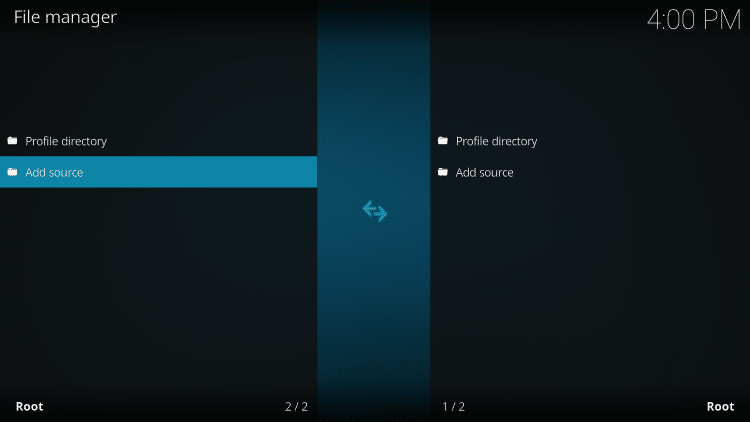
- Select File Manager

- Click Add source

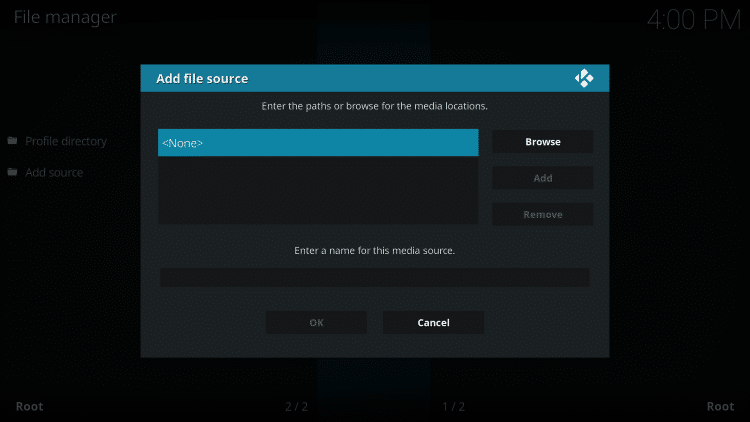
- Click <None>

- Type the following url exactly how it is listed here – http://tempest.zapto.org/repo/ and click OK

- Highlight the box under the source that you just typed in and enter a name for this media source, type temp or any other name you would like to identify this source as and click OK again

- Click your back button on remote or keyboard until you are back at the Kodi home screen
- Click Add-ons menu item

- Select the small “open box” icon at the top left side of the page under the “Add-ons heading”


- Click Install from zip file

- Choose temp or another name you assigned the media source in the previous step

- Click repository.tempest.zip

- Wait for Tempest Repo Add-On installed message to appear

- Click Install From Repository

- Choose Tempest Repo

- Click Video Add-Ons

- Select Tempest

- Click Install

- Kodi will then prompt the message below stating “The following additional add-ons will be installed”, Click OK

- Wait for the Tempest Add-on installed message to appear

Enjoy!
#8...EXODUS 13C VIDEO
Exodus 13C Video is a fantastic Addon from 13 Clowns repo that has wide variety of content offer.
Exodus 13C Video offers you to watch movies, TV Shows, IPTV, Cartoons and more within Kodi.
There is also a section for watching one-click movies and movies from 13Clowns Video addon
Exodus 13C Video uses Civitas Scrapper to scrap its content.
This Addon also supports RealDebrid for watching high-quality movies with smooth playback..
How to install Exodus 13C Video addon
• Open Kodi
• Click System Settings Button
• Click File manager
• Then scroll down to select Add source
• A box will popup, select <None>
• In media location box, you need type exactly this url: https://the13clowns.github.io/ & click OK to confirm
• In media source box, give for it a name, ex: the13clowns & continue click OK to confirm
• Go back to kodi home screen, select the line Add-ons
• Then click Add-ons Browser (box icon) on top left bar
• Now, select Install from zip file
• Find and click the line the13clowns in your list
• Continue select repository.13clowns-x.x.x.zip (select newest version)
• Wait few seconds, you'll see a notification say that "13Clowns Repo Add-on installed", go to next steps
• Now, select Install from repository
• Scroll down to find & select .13CIowns Repository from your repositories list
• Select Video-addons
• Find and select Exodus 13C Video
• Click Install button to begin install this addon on your kodi
• Pls patient, this process will spent fews seconds or longer...All process will finished after you see the kodi's notification say that "Exodus 13 Clowns Version add-on installed".
#9...YODA
Named after the legendary Jedi character from Star Wars, Yoda Kodi addon has brought itself to the spotlight recently and all for good reasons. Yoda is a fork/variant of the ever-popular Exodus and Covenant video add-ons but it has a touch of newness and difference. What’s self-vouching of its credibility is the fact that it comes straight from the Supremacy repository, which also offers Supremacy Kodi Addon. And we all know how uncompromising this repository can get when it comes to the quality of the addons.
How to install Yoda addon
How to install Yoda addon
- Open Kodi
- Select Settings (cog icon top left)
- Select File Manager
- Select Add Source
- Select None
- Type the following EXACTLY http://supremacy.org.uk/zip/repo/ and select OK
- Highlight the box underneath marked Enter a name for this media source
- Type sup then click OK
- Go back to your home screen
- Select Add-ons from the left hand menu
- Select Browser (icon that looks like a box top left)
- Select Install from zip file
- Select sup
- Select repository.supremacy-x.x.zip
- Wait for the Add-on enabled notification
- Select Install from Repository
- Select supremacy
- Select Video add-ons
- Select Yoda
- Select Install
- Wait for Add-on installed notification
#10...MEDUSA
Medusa Kodi addon brings to you a huge library of movies and TV shows. Not only will you find the most recent flicks and episodes here, but you can also explore a massive collection of movies from the past. Medusa looks like a fork of once very popular and now non-functional addon Poseidon. It borrows the simplicity and ease of use from its predecessor. However, it also offers several enhancements.
Probably the first thing you will notice is its fast navigation. You can swiftly browse through categories and hope from one option to another. Medusa also fetches the streams quickly and plays the chosen link almost immediately. It took me no time to figure that it must be the part of our Best Kodi Addons list. For now, the addon looks great and I hope it continues the same way for long.
How to install Medusa addon
1. Open your Kodi
2. Select System icon in the top left bar
3. Select File manager
4. Click Add source
5. Click None in the Add file source box
6. Now, type exactly this URL: http://medusa1.co.uk/medusa/ on box
7. Type a name, ex: medusa and click OK to confirm
8. Go back to home kodi screen, select Add-ons
9. Select Add-on browser (box icon)
10. Then click Install from zip file
11. Select medusa from your list
12. Continue select repository.medusa-0.0.6.zip or higher
13. Wait few second, you'll see a notification "Medusa Repo Add-on installed"...go to next step
14. Select Install from repository
15. Scroll down to select medusa in your repo list
16. Click Video add-ons
17. Select addon Medusa
18. Click Install button
Probably the first thing you will notice is its fast navigation. You can swiftly browse through categories and hope from one option to another. Medusa also fetches the streams quickly and plays the chosen link almost immediately. It took me no time to figure that it must be the part of our Best Kodi Addons list. For now, the addon looks great and I hope it continues the same way for long.
How to install Medusa addon
1. Open your Kodi
2. Select System icon in the top left bar
3. Select File manager
5. Click None in the Add file source box
6. Now, type exactly this URL: http://medusa1.co.uk/medusa/ on box
9. Select Add-on browser (box icon)
10. Then click Install from zip file
11. Select medusa from your list
15. Scroll down to select medusa in your repo list
16. Click Video add-ons
SUMMARY:
So, today we have updated new list top 10 best movie kodi addons 2019. Hope with these kodi addons from our list, you can use them to find and enjoy watching many favorite movies & tv shows with high quality such as 720 or 1080p quality...
So, today we have updated new list top 10 best movie kodi addons 2019. Hope with these kodi addons from our list, you can use them to find and enjoy watching many favorite movies & tv shows with high quality such as 720 or 1080p quality...

